For novices who plant hydroponic vegetable gardens, cultivating Jianshe’s vegetable seedlings and cutting seedlings is one of the greater challenges they will face. The best conditions for germination and rooting of different varieties of crops are different. We can query the germination temperature of different crops. If the first attempt to raise seedlings or cuttings fails, please do not be discouraged, you need to try several times to find the most suitable method. If it doesn’t work, you can also buy seedlings from the seedling base and transplant them into the hydroponic system.
Prepare rock wool
(Rock wool is an inorganic fiber made from natural rock as the main raw material, melted and fibrillated at high temperature. It is a new type of soilless culture solid substrate with good air permeability and water retention.)
It is very important to rinse the rock wool before planting. Some rock wool growers like to soak the rock wool overnight, but the author finds it unnecessary. Strictly speaking, rock wool should be rinsed or soaked in water with a pH of 5.5, but the author found that this is actually unnecessary. Someone has successfully used rock wool with a pH of 5 to 7 for seedling cultivation. If you don’t have a pH meter, don’t worry, you still have a chance of success. The initial rinsing of rock wool can be done with water or nutrient solution, but must be rinsed with nutrient solution at the end, so that the seedlings or cuttings can get nourishment once they take root. Most people recommend the use of one-quarter to one-half concentration of nutrient solution, but Luis has also successfully raised seedlings in one-quarter to full (100%) nutrition. In the process of plant growth, the environment will mostly fluctuate slightly, so there is no need to worry about the slight discrepancy between the pH value, nutrient solution concentration, root temperature and standard values.
The preferred method for cleaning rock wool is to use a mesh tray, which can easily wash away any loose rock wool dust. We can also rinse the rock wool at the bottom of a sturdy tray, just soak and discard the excess nutrient solution.
Rock wool nursery
Rock wool seedling raising is a simple and convenient method. Temperature, light, humidity, and gas (oxygen, carbon dioxide) are the key factors for success. There are many methods for raising rock wool seedlings, and the methods provided here have been used many times in household hydroponics and commercial hydroponic systems. There are many known rock wool seedling raising methods that are very simple and require low equipment, but Luis’s purpose is to provide a method that requires the least effort to achieve the greatest success.
material
Rock wool block [Grodan (brand) A-OK 36/40]
25cm x 51cm mesh tray with holes
Nutrient solution
Seedling raising warming pad with controller
seed
Labels and markers
Aerosol bottle
Transparent cover with circular moisture outlet
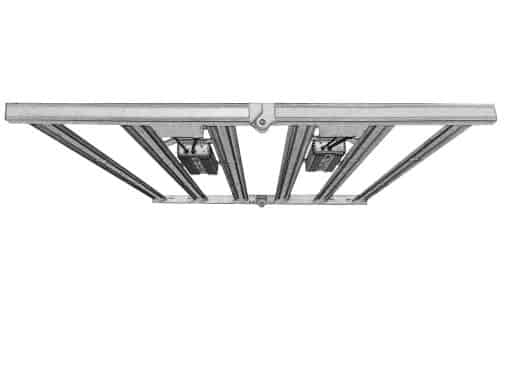
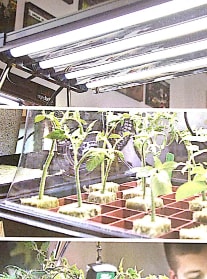
T5 fluorescent lamp (60cm length, 4 tubes)
fan
- Place the rock wool strips on a 25cm x 51cm mesh tray with holes, and rinse the rock wool with 1/2 concentration of nutrient solution.
- Let the excess nutrient solution flow through the rock wool along the mesh tray.
- Place the mesh tray on the non-porous tray so that the rock wool block can come into contact with water but is not yet submerged in water.
- Place the entire tray on the seedling warming pad.
- Sow seeds on rock wool slivers.
- Only one pelleted seed is sown in each hole.
- If you plant basil, in order to obtain a higher yield, it is recommended to sow 3 to 8 basil seeds per hole. Even if it is sprinkled on the surface of rock wool, basil can germinate well.
- Use unpelleted seeds, the yield of lettuce will be higher, it is recommended to sow 3 to 5 seeds per hole.
- For crops such as tomatoes, peppers, cucumbers, and eggplants, 2 seeds should be sown per hole. After the seeds germinate, select one of the two plants that is growing well and pull out the other one to avoid cavities caused by ungerminated seeds.
- Mark the variety. Use a marker to write the variety information on the label or record it on paper.
- After sowing, spray the seeds with an aerosol bottle to increase the humidity and promote the germination of the seeds. Because of the addition of a shell of pelletized seeds, the seeds cannot directly contact with rock wool. Spray treatment can increase the humidity of pelletized seeds and promote seed germination.
- The seedling raising warming pad is connected with the temperature controller, and the thermometer of the controller is inserted into the rock wool through the circular moisture outlet.
- Fix the transparent cover (which can maintain a certain humidity) on the tray, and tighten the loose wire on the thermometer.
- Set the temperature controller to the lowest temperature required.
- In the first few days after sowing, there is basically no need for management. The water in the rinsed rock wool is sufficient to meet the needs of seeds.
- Most plants can germinate 3 to 5 days after sowing. When 50% of the seeds have germinated, remove the transparent cover.
- Failure to remove the transparent cover in time will increase the probability of seedlings contracting fungal diseases or even death.
- When the moisture in the rock wool is sufficient, the rock wool will be heavy, but as the moisture decreases, the rock wool will become lighter. Pick up the tray and feel the weight so that you can know if the seedlings need glue. When the tray is light, it is necessary to water the nutrient solution, usually once every 2 to 3 days. This frequency is affected by the indoor temperature and the growth of the crops. Due to different environments, the seedlings may be transplanted into the hydroponic system within 1 to 2 weeks. During this period, we may not need to water the seedlings.
Collect cuttings
Use clean tools to cut cuttings from well-growing plants. This step is difficult for many novices. The most suitable environment for cuttings is also beneficial to the disease, and the seedlings will also get sick and even die. Therefore, you must wash your hands, grafting scissors, and other tools before cutting. Many growers wear gloves and use alcohol wipes to disinfect tools to prevent infection.
The minimum length of the cuttings is related to the level of the grafting technique. The cuttings are usually as long as possible (15cm or more), and they can be shortened later as needed. Remove all the side branches and leaves, leaving only a few leaves at the top of the cuttings.
Cut at the upper part of the pitch
Whenever possible, choose cuttings with thick stems (left) rather than thin stems (right)
Remove side branches and leaves
Only a few leaves are needed for cuttings. Too many leaves may cause the plant to die before rooting. Prepare more cuttings for emergencies
Remove all the flowers, so that the plant’s nutrients are more for the roots to grow instead of flowering and fruiting
Keep the obtained cuttings in water
Use place: Indoor or cool greenhouse
Cultivation substrate: rock wool
Do you need power supply: indoors, not outdoors
Crops: basil, mint, sage, rosemary, thyme, lavender, tomato, pepper, sweet potato and others
Rock wool cuttings
There are many ways to cut rock wool. This article lists some improved methods, please choose according to the type of crop and the cultivation environment.
Materials and tools
Rock wool block [Grodan (brand) A-OK 36/40]
Nutrient solution
25cm x 51cm non-perforated tray
Sharp grafting shears or knives
Root hormone (optional)
Transparent cover with circular moisture outlet
T5 fluorescent lamp (60cm length, 4 tubes)
Seedling warming mat with controller (optional)
Gro-Smart tray (optional)
- After rinsing the rock wool with a half-concentration nutrient solution, place it in a non-porous tray. Use sharp grafting shears to collect cuttings.
- Prune the cuttings to 10~18cm and make a 45° angle incision below the internodes. (Optional) Some growers prefer to make a horizontal cut at the lower end of the cuttings and then cut the stem at the bottom. Some growers like to make a 45° angle cut, and some growers use both methods. (Optional) Some people peel off the skin on the lower end of the cuttings. Expose the cambium, which is a white layer inside the stem from which the roots are produced. (Optional) Rooting hormone is very useful for rooting crops. Some growers use honey instead of rooting gel.
- When using rooting hormone, be sure to wear gloves.
- Pour part of the rooting solution into a separate container to prevent contamination of the entire bottle.
- Put the cut end of the cuttings into the rooting hormone, and drain the excess liquid before loading the matrix block.
- Cuttings can be planted in the following ways.The standard method is to insert cuttings into pre-dug holes (approximately 2.5 cm in depth).Another method is to dig a smaller hole so that the cuttings fit the hole more closely. When using thinner cuttings, this method can make the stem and rock wool come in closer contact and improve the survival rate.There is another method to insert the cuttings into the bottom of the rock wool block. This is the same as the previous method to increase the contact area, and because the bottom of the rock wool block is larger, it can be placed in the tray without support.
- Try not to shade between plants. Shading between plants will increase humidity and increase the risk of fungal diseases in seedlings.
- Securely fasten the transparent cover with a moisture drain on the tray and place it under low-intensity light. Only two of the four light tubes are turned on to reduce the light intensity and prevent the seedlings from causing potential damage to the plants due to excessive photosynthesis.
- If the cuttings begin to wilt before rooting, you need to cut off a few more leaves to reduce transpiration and reduce light intensity. Add more water to the bottom of the tray to increase humidity or adjust the temperature of the warming pad. But do not add too much water to the tray to soak the rock wool block in the water.
- A warming pad with a controller is good for rooting, and most growers set the temperature at 21 ~ 27°C.
- Adjust the size of the circular vents to slowly adapt the cuttings to normal humidity levels.
- The cuttings of some plants may take less than a week to root, but most of them take several weeks or longer to reach the standards for transplanting. When the roots of the cuttings grow out of rock wool blocks, they can be transplanted.
Hydroponic Cuttings
Most hydroponic vegetable garden growers find that hydroponic cuttings are much easier than rock wool cuttings. Plants root faster in solution and suffer less stress during the rooting process. Rooting hormones are rarely needed. Various methods can be used for hydroponic cuttings, such as spray culture and late-night flow hydroponics. Next, Luis will explain in detail the cuttings in the late-night water culture, and the fog culture is also applicable.
Hydroponic cuttings will not restrict the growth of plants. Plants can grow to maturity. Some people have successfully planted strawberries with full fruits and vigorous mint. Hydroponic cuttings can be used to raise seedlings and can also be used as a planting method.
- Use sharp grafting shears to collect the cuttings (according to the operation in “Rock wool cuttings” to collect the cuttings), usually the cutting length is about 15cm, after cutting, you can ensure that at least 2.5cm of stems are soaked in the nutrient solution .
- Assemble the cutting system. If it is used indoors, place it under a growing lamp.
- Use 1/2 concentration nutrient solution or hydroponic fertilizer specially used for cutting roots (also called “cutting solution”).
- Insert the air pump and water pump.
- Use a soft sponge to secure the cuttings, making sure that no leaves are stuck in the sponge.
- Place the plants evenly and cover all unused holes with a sponge.
- After 4 to 7 days, most cuttings begin to take root, and some plants may take longer to take root.
- When the roots of the cuttings grow to a certain size, we can remove the sponge and transplant them into the hydroponic system.
Applicable places: indoor or in the shade of a greenhouse
Cultivation substrate: rock wool, nutrient solution
Do you need power supply: Need
Crops: basil, mint, sage, rosemary, thyme, lavender, tomato, pepper, sweet potato and any other varieties that can be rooted by cuttings.
Transplanting soil to cultivate vegetable seedlings
Novices who grow hydroponic vegetable gardens prefer the seedlings that are cultivated in soil, because it is convenient to buy seedlings from the seedling base or directly use soil to cultivate seedlings. The hydroponic system can be applied to vegetable seedlings cultivated in traditional soil, but this is not the best method, because we usually lose or damage some roots during the process of washing the root soil, which will increase the possibility of plant infection of root diseases.
If the irrigation pipes in the hydroponic system are very thin (≤ 0.5cm), then the soil particles remaining at the roots of the plants may block the pipes.
The survival rate of soil-cultured seedlings after transplanting is low, so it is recommended that growers use hydroponics. However, Luis personally likes this process of washing the soil at the roots of plants very much.
- Try to remove all fruits and dense paper from the plant. The reduction of fruits and paper strips means that the water required by the plant is reduced, thereby reducing the requirement for water absorption by the roots. If the root system of the plant is damaged during the washing process, it will not be able to provide the plant with the required nutrients and water, so root damage must be reduced as much as possible.
- Remove the soft floating soil above the plants.
- Remove the plant from the pot.
- Dip the root system gently in the water.
- Shake the plants gently to shake off the soil at the roots.
- Loosen the roots with your fingers, exposing the soil clumps inside the root system.
- When cleaning the root system, the water needs to be changed constantly, and the whole process can be rinsed with a slow-flowing water pipe.
- Under the premise of not damaging the root system, pick out the remaining soil particles.
- Dig a planting hole in the substrate.
- Insert the plant into the customized hole to cover the root system.
- After transplanting, water the planting water so that the roots are in full contact with the substrate.